CHEST AP
Anteroposterior Chest Projection • Posteroanterior Chest Radiograph

High Exposure - High Penetration
Purpose: To penetrate dense mediastinal tissues and visualize retrocardiac structures
Comparison: kV and mAs are significantly higher than in extremity radiographs
Exposure Factors
Increased Distance: 150-180 cm to reduce cardiac magnification and improve definition.
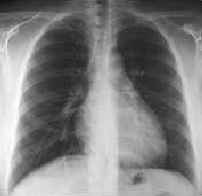
Visible Anatomical Structures
The following structures will appear:
- Lung apices
- Both clavicles
- Aortic arch
- Apex of the heart
- Costophrenic angles
- Complete lungs
- Main bronchi
- Ribs
- Scapulae (projected laterally)
- Thoracic vertebral bodies
- Last cervical vertebrae (C6-C7)
- First lumbar vertebrae (L1-L2)
Image Receptor Size
Orientation: Landscape (Transverse)
Justification: Large enough to include the entire thorax from lung apices to costophrenic angles.
Patient Positioning
Scapular Positioning
"The shoulders must be directed forward so that the scapula does not interfere with the visualization of the lungs"
Two options to achieve this:
- Elbows flexed with the back of the hands resting on the hips
- Arms around the bucky, hugging the wall unit
Purpose: To project the scapulae laterally out of the lung fields.
Bedridden or Seated Patient
"If the patient is bedridden or seated, a chest X-ray will be performed in anteroposterior (AP) projection"
- Perform in supine or seated position
- IR placed behind the patient (true AP position)
- Greater cardiac magnification than in standing position
- Limited evaluation of pleural fluids
Central Ray Point
Localization: 6th Thoracic vertebra (between the tips of both scapulae)
Angulation: Perpendicular to the plane of the IR
Direction: Horizontal (standing) or Vertical (supine)
Centering: Midsagittal plane at the level of T6
Breathing Technique
DEEP INSPIRATION (Standard Technique)
"Just before the exposure, the patient must take a deep breath and hold the air inside the lungs during the procedure"
- Maximum pulmonary expansion
- Better visualization of lung fields
- Depressed diaphragm
- Well-defined costophrenic angles
DEEP EXPIRATION (Medical Indication)
"Sometimes, the doctor will request expiration; then we will instruct them to slowly release the air and we will trigger the exposure when lungs are empty"
- To evaluate small pneumothorax
- Detect air trapping
- Visualize mobile foreign bodies
- Evaluate diaphragmatic movement
Characteristics of an Optimal Image
Complete Lungs
From apices to costophrenic angles
Heart
Defined size and contours
CP Angles
Sharp and defined costophrenic angles
Clavicles
Symmetrical, equidistant from spinal lines
Vertebrae
Visible through the heart shadow
Scapulae
Outside of the lung fields
Common Technical Challenges
Frequent issues in AP Chest radiography:
- Overlapping scapulae over lung fields (shoulders not forward)
- Patient rotation causing clavicular and mediastinal asymmetry
- Insufficient inspiration that doesn't fully expand lungs
- IR placed too low cutting off costophrenic angles
- Chin not elevated superimposing the jaw over apices
- Incorrect exposure (kV/mAs) that fails to penetrate or "burns" lungs
- Motion during exposure due to failure to hold breath
- Excessive cardiac magnification due to insufficient SID
Solution: Verify shoulder position, instruct deep inspiration, use 150-180 cm SID, center correctly.
Special Considerations
Geriatric Patients
Possible kyphosis may require centering adjustments. Difficulty raising arms.
Obese Patients
Increase kV up to 140, mAs up to 250-300. Consider gridless technique for morbidly obese.
Bedridden Patients
Perform AP in supine position. Increased heart magnification. Evaluation of fluids has limitations.
Pneumothorax
Request projection in expiration for better visualization of the pleural line.